Step 2: Run following command to your ionic command prompt, So that
Cloud Client allows you to interact with our services from your app.
$ npm install @ionic/cloud –save
$ npm install bluebird --save
Step 3: Once both installed, you’ll need to copy the bundled JavaScript
file into your app’s www/lib directory.
Copy:
·
node_modules/@ionic/cloud/dist/bundle/ionic.cloud.min.js
·
node_modules/bluebird/js/browser/bluebird.min.js
Past:
1.
www/lib
Then you can
include it in your project’s
index.html after and before the ionic.bundle.js include:
Complete code of
HTML page.
<!DOCTYPE html>
<html>
<head>
<meta charset="utf-8">
<meta name="viewport" content="initial-scale=1, maximum-scale=1, user-scalable=no,
width=device-width">
<title></title>
<link rel="manifest" href="manifest.json">
<link href="lib/ionic/css/ionic.css" rel="stylesheet">
<link href="css/style.css" rel="stylesheet">
<script src="lib/bluebird.min.js"></script>
<!--
ionic/angularjs js -->
<script src="lib/ionic/js/ionic.bundle.js"></script>
<script src="lib/ionic.cloud.min.js"></script>
<!--
cordova script (this will be a 404 during development) -->
<script src="lib/angular-websocket/dist/angular-websocket.js"></script>
<script src="lib/ngCordova/dist/ng-cordova.js"></script>
<script src="lib/ionic-service-core/ionic-core.js"></script>
<script src="lib/ionic-service-push/ionic-push.js"></script>
<script src="lib/ionic-platform-web-client/dist/ionic.io.bundle.js"></script>
<!--<script
src="cordova.js"></script>-->
<!--
your app's js -->
<script src="js/jquery1.11.1.js"></script>
<script src="js/app.js"></script>
</head>
<body ng-app="starter" class="platform-android platform-cordova
platform-webview">
<ion-pane>
<ion-header-bar class="bar-stable">
<h1 class="title">Ionic Blank Starter</h1>
</ion-header-bar>
<ion-content>
<div style="float:left" ng-controller="MyCtrl">
<div style="float:left">
{{LogInUser}}
</div>
<br />
<div>
<textarea type="text" style="background-color:lightgray"> {{deviceDetalis}} </textarea>
<label> {{deviceDetalis}} </label>
</div>
<div style="float:none">
<button class="button button-assertive" ng-click="login()">
LogIn Detals
</button>
<button class="button button-assertive" ng-click="ionicRegister()">
Reg. User To Device
</button>
<button class="button button-assertive" ng-click="ionicMessage()">
ionic Message
</button>
</div>
<div style="float:left">{{UserDetails}}</div>
</div>
</ion-content>
</ion-pane>
</body>
</html>
Step 4: you’ll need to have an app ID. In your project directory for
this, you have to run following code. We assumes you’ve created an Ionic account. If not, go ahead and
create one before continuing.
$ ionic io init
This will automatically create an app in the dashboard of Ionic account,
and set the generated App ID in your ionic.config.json file.

Step 4: Add angular dependency injection. In your www/js/app.js file:
Add the ionic.cloud module to your array
of dependencies and inject $ionicCloudProvider into your config block and pass
in your cloud configuration. Replace APP_ID with
your app’s ID, which you can find in your ionic.config.json
file. As shown in screenshot.

Step 5: When you install Phonegap’s push plugin to receive native push
notifications, you need to supply a SENDER_ID variable, which is your FCM
Sender ID.
To get FCM Sender ID you have to logIn here by your google account.
1.
After login Create new project.
2.
Project setting
3.
Cloud messaging there you can find your Sender ID and Server Key
$ cordova plugin add phonegap-plugin-push
--variable SENDER_ID=1xxxxxxxxx4 –save
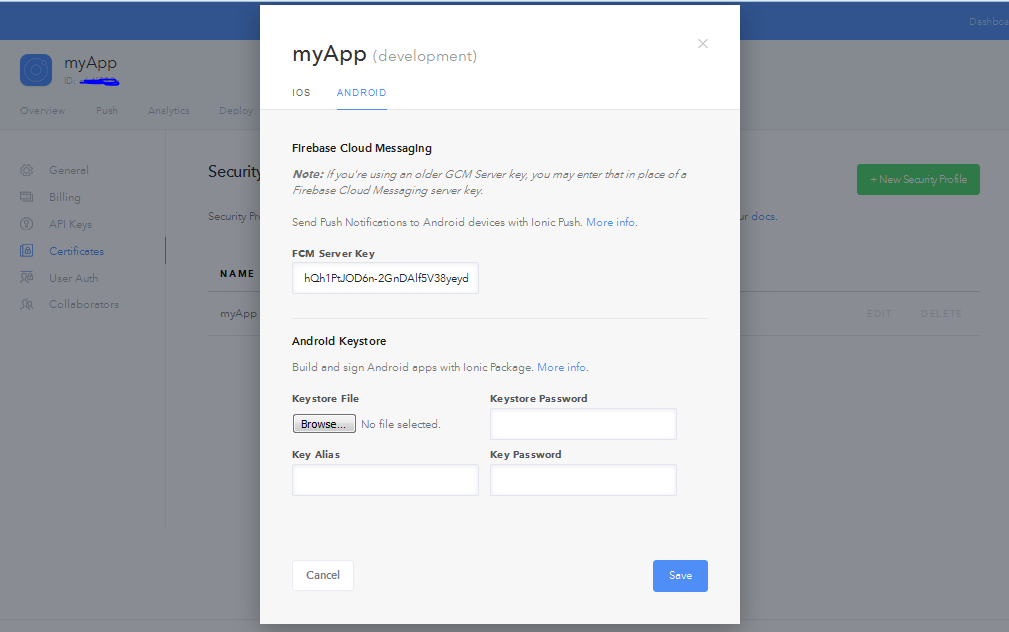
Step 6: You have to fill in the following as shown in screenshot.
APP_ID Your app’s ID
SENDER_ID Your
FCM Sender ID
Server
Key Your FCM Server Key [Token]

Complete code of
app.js
var div = "";
angular.module('starter', ['ionic', 'ionic.cloud', 'ngCordova', 'ionic.service.core', 'ionic.service.push'])
.config(function ($ionicCloudProvider) {
$ionicCloudProvider.init({
"core": {
"app_id": "8xxxxxxxa"
},
"push": {
"sender_id": "1xxxxxxxxxx4",
"pluginConfig": {
"ios": {
"badge": true,
"sound": true
},
"android": {
"iconColor": "#343434"
}
}
}
});
})
.controller('MyCtrl', function ($scope, $ionicPush, $ionicUser, $ionicAuth, $rootScope,
$timeout) {
$scope.$on('cloud:push:notification', function (event, data) {
var msg = data.message;
alert(msg.title + ': ' + msg.text + ': UserId' + $ionicUser);
});
debugger;
var authProvider = 'basic';
var authSettings = { 'remember': false };
var loginDetails = {
'email': 'vxxxxxxxxxxxxxx@gmail.com',
'password': 'xxxxx'
};
$scope.login = function (provider) {
Ionic.Auth.login(authProvider,
authSettings, loginDetails)
.then(function () {
debugger;
var user = Ionic.User.current();
$scope.LogInUser =
JSON.stringify(user)
console.log('user currently: ' +
JSON.stringify(user));
if (user.isAuthenticated()) {
console.log('Authenticated');
} else {
console.log('fail Authenticated');
}
if (div != "") {
$rootScope.deviceDetalis
= div;
}
retrieveOrCreateUser(function () {
registerPush();
});
}),
function (errors) {
for (var err in errors) {
// check the error and provide an appropriate message
// for your application
$scope.customRegistration();
};
}
}
$scope.customRegistration = function () {
//this
will work one time
debugger;
Ionic.Auth.signup(loginDetails).then(function (newUser) {
console.log('signup worked ok, here is the new user ' + JSON.stringify(newUser));
//what's
the user ob like now?
user = Ionic.User.current();
//are
they logged on? the docs imply NO
console.log('newly signed up user logged in?', user.isAuthenticated());
}, function (error) {
console.log('signed failed with ' +
JSON.stringify(error));
});
};
var user = Ionic.User.current();
//console.log('user
currently: ' + JSON.stringify(user));
$scope.LogInUser = JSON.stringify(user)
debugger;
if (user.isAuthenticated()) {
console.log('yes auth');
//$scope.login();
//
$scope.customRegistration();
} else {
console.log('no auth');
$scope.login();
debugger;
//$scope.customRegistration
//$scope.loginButton
= { hidden: false };
}
$scope.ionicMessage = function () {
debugger;
var settings = {
"async": true,
"crossDomain": true,
"url": "https://api.ionic.io/push/notifications",
"method": "POST",
"headers": {
"content-type": "application/json",
"authorization": "Bearer rxxxxxxxxxxxxx",// Server Key of ur Firbase
"cache-control": "no-cache"
},
"processData": false,
"data": "{\r\n \"tokens\": [\"" + div + "\"],\r\n \"profile\":
\"test\",\r\n
\"notification\": {\r\n
\"message\": \"Hello World!\"\r\n }\r\n}"
}
$.ajax(settings).done(function (response) {
console.log(response);
});
}
$scope.fnUsers = function () {
debugger;
var settings = {
"async": true,
"crossDomain": true,
"url": "https://api.ionic.io/users",
"method": "GET",
"headers": {
"content-type": "application/json",
"authorization": "Bearer rxxxxxxxxxxxxx",// Server Key of ur Firbase shown in above screen shot
"cache-control": "no-cache"
},
"processData": false,
"data": "{\r\n \"tokens\": [\"" + div + "\"],\r\n \"profile\":
\"test\",\r\n
\"notification\": { \r\n
\t\"title\": \"Hi\",\r\n \"message\": \"Hello
World!\",\r\n
\"android\": {\r\n
\"title\": \"Hey\",\r\n \"message\": \"Hello
Android!\"\r\n \t\r\n }\r\n
}\r\n}"
}
$.ajax(settings).done(function (response) {
debugger;
$scope.UserDetails =
JSON.stringify(response);
console.log(JSON.stringify(response));
});
}
$scope.ionicRegister = function () {
debugger;
var DivToken = div.split('-');
DivToken = DivToken[1] + '-' + DivToken[2] + '-' + DivToken[3] + '-' + DivToken[4] + '-' + DivToken[5]
var settings = {
"async": true,
"crossDomain": true,
"url": "https://api.ionic.io/push/tokens",
"method": "POST",
"headers": {
"content-type": "application/json",
"authorization": "Bearer rxxxxxxxxxxxxx",// Server Key of ur Firbase
"cache-control": "no-cache",
},
"processData": false,
"data": "{\r\n \"token\":\"" + DivToken + "\",\r\n
\"user_id\":\"83a1fc58-35b2-43db-b9f8-3990ee74c878\"\r\n}"
}
$.ajax(settings).done(function (response) {
console.log(response);
});
}
})
.run(function ($ionicPlatform,
$http, $ionicPush, $ionicUser, $ionicAuth) {
$ionicPlatform.ready(function () {
if (window.cordova &&
window.cordova.plugins.Keyboard) {
// Hide
the accessory bar by default (remove this to show the accessory bar above the
keyboard
// for
form inputs)
cordova.plugins.Keyboard.hideKeyboardAccessoryBar(true);
// Don't
remove this line unless you know what you are doing. It stops the viewport
// from
snapping when text inputs are focused. Ionic handles this internally for
// a
much nicer keyboard experience.
cordova.plugins.Keyboard.disableScroll(true);
}
if (window.StatusBar) {
StatusBar.styleDefault();
}
debugger;
var user = Ionic.User.current();
debugger;
//Ionic.Push();
var push = new Ionic.Push({
"debug": true
});
push.register(function (token) {
console.log("My Device token:",
token.token);
if (div==""){
div = token.token;
}
debugger;
if (user.isAuthenticated()) {
debugger;
console.log('yes auth');
//push.addTokenToUser(user);
alert('yes auth');
user.set('name', 'vjiay ready');
user.set('bio', 'Developer Testing');
user.save();
console.log('save user ready');
alert('save user ready')
push.saveToken(token, { 'ignore_user': false }); //
persist the token in the Ionic Platform
alert("saveToken on ready");
}
var SERVICE = "http://xxxxxxxxxxxxxx/Service.svc/";
var req = {
method: 'GET',
url: SERVICE + 'RegisterUserToken?TokenId=' +
token.token
};
$http(req).success(function (e) {
});
});
});
})
Step 7: Device
must be register before receive native push notifications. It’s recommended to
call register() every time the app is opened so the device is always registered
and ready for notifications.

Thank you very much for writing such an interesting article about the react native push notifications .This has really made me think and I hope to read more.
ReplyDelete