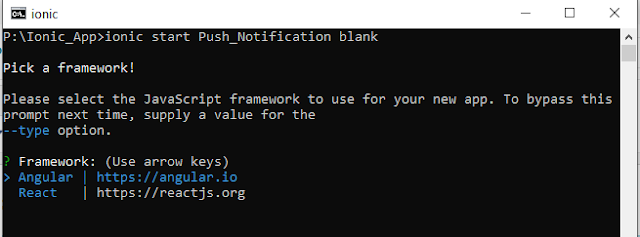
Step 1: Start with the following command and choose framework Angular as shown in the image.
$ ionic start Push_Notification blank
Step 2: After completion of step 1 go to your root folder i.e 'Push_Notification' and run the below command to add the PhoneGap plugins, for more details click here.
$ ionic cordova plugin add phonegap-plugin-push
Step 3: Import the plugin in app.module.ts, as shown in the image.
import { Push, PushObject, PushOptions } from '@ionic-native/push/ngx';
providers: [
Push,
],
Step 4: Also, import the plugin in your home.page.ts where we have to implement certain actions as shown below.
import { Component } from '@angular/core';
import { Push, PushObject, PushOptions } from '@ionic-native/push/ngx';
import { AlertController } from '@ionic/angular';
@Component({
selector: 'app-home',
templateUrl: 'home.page.html',
styleUrls: ['home.page.scss'],
})
export class HomePage {
public token: any;
constructor(private push: Push,public alertController: AlertController) {
// To check, if we have permission.
this.push.hasPermission()
.then((res: any) => {
if (res.isEnabled) {
console.log('We have permission to send push notifications');
this.initPush();
} else {
console.log('We do not have permission to send push notifications');
}
});
setTimeout(()=>
{
if(localStorage.getItem('registrationId') != "")
{
this.token = localStorage.getItem('registrationId');
}
},2000)
}
async presentAlert(_notification:any) {
const alert = await this.alertController.create({
cssClass: 'my-custom-class',
header: _notification.title,
message: _notification.message,
buttons: ['OK']
});
await alert.present();
}
async RegAlert(_notification: string) {
const alert = await this.alertController.create({
cssClass: 'my-custom-class',
header: 'Device registered',
message: _notification ,
buttons: ['OK']
});
await alert.present();
}
initPush() {
const options: PushOptions = {
android: {},
ios: {
alert: 'true',
badge: true,
sound: 'false'
},
windows: {},
browser: {
pushServiceURL: 'http://push.api.phonegap.com/v1/push'
}
}
const pushObject: PushObject = this.push.init(options);
pushObject.on('notification')
.subscribe((notification: any) => {
this.presentAlert(notification)
});
pushObject.on('registration')
.subscribe((registration: any) => {
this.token = registration.registrationId
localStorage.setItem('registrationId',registration.registrationId)
this.RegAlert(JSON.stringify(registration));
});
pushObject.on('error').subscribe(error => {
alert(JSON.stringify(error));
});
}
}
Step 5: Create 'google-service.json' at Console firebase and paste to your project i.e Push_Notification' as shown in the image.
Step 6: After carrying out all the above steps properly, make the following changes to your 'config.xml' file. For more details click here.
<platform name="android">
<resource-file src="google-services.json" target="app/google-services.json" />
</platform>
<plugin name="phonegap-plugin-push" spec="~2.2.0">
<variable name="FCM_VERSION" value="15.0.0" />
<variable name="SENDER_ID" value="XXXXXXXXXXXX" />
</plugin>
Note: You can get SENDER_ID at your Firebase Console, under tab cloud messaging. For more details click here.
Step 7: Run below code to add an Android platform.
$ ionic cordova platform add android
Step 8: Once the platform is added, run the app on the device (Make sure you have a device or simulator attached to the system. Push notifications might not work on a simulator.)
$ ionic cordova run android
Step 9: Once your app is up and running on the device or simulator, you can send notifications through the Firebase console.
Note: You can also send the notification through C#, for more details click here.


This comment has been removed by the author.
ReplyDeleteNice Article, Blog theme is also very user friendly. Tech information is also good on this blog. Also checkout - Push Notification in App
ReplyDeleteThanks